# 7. Building a WebUI
It's time. We have a JavaScript class that handles communication with the camera, and we've already seen how we can use the data to drive HTML elements
on a web page. So, now, let's put it all together and make a functional web UI for controlling a camera or HyperDeck.
There are many ways you can solve these programming problems. My way is not necessarily correct, and it is definitely not the only way,
so please take this tutorial as an example, not gospel.
## Starting Small
Let's start with something easy: a minimal web page that connects to one camera and has some unstylized buttons for sending basic commands. This will give us
a chance to get our toes wet before jumping in head-first. I'll provide the finished code for this basic web page at [examples/WebUIBasic.html](examples/WebUIBasic.html).
Here's the basic HTML boilerplate for any new webpage:
```HTML
<!DOCTYPE html>
<html>
<head>
<title></title>
</head>
<body>
</body>
</html>
```
Next, I'll add a title, basic header, and link our `BMDevice_WS.js` file in a `<script>` tag:
```HTML
<!DOCTYPE html>
<html>
<head>
<title>Demo Blackmagic WebUI</title>
</head>
<body>
<!-- Import Scripts -->
<script src="BMDevice_WS.js"></script>
<!-- Page Contents -->
<h1>Demo Blackmagic WebUI</h1>
</body>
</html>
```
Our first step is to add a text input for the device's hostname and a button to start the connection. The HTML for those looks like this:
```HTML
<input type="text" id="hostnameInput">
<button>Connect</button>
```
But these don't do anything yet. Let's write some new JavaScript code to interface these HTML elements with our BMDevice class.
I'll put it in a `<script>` tag at the bottom of the page body.
```JS
var device;
function initConnection() {
// We're expecting the user to enter the hostname by itself, with the .local suffix, no http://
let hostname = document.getElementById("hostnameInput").value;
device = new BMDevice(hostname);
}
```
Remember `document.getElementById`? It's gonna be our best friend real soon.
Now we add an `onclick` property to the button, having it call `initConnection()` when it's pressed.
I'll also add a `<span>` tag that we'll update to say "connected" if it's successful.
So now our page looks like this:
```HTML
<!DOCTYPE html>
<html>
<head>
<title>Demo Blackmagic WebUI</title>
</head>
<body>
<!-- Import Scripts -->
<script src="BMDevice_WS.js"></script>
<!-- Page Contents -->
<h1>Demo Blackmagic WebUI</h1>
<input type="text" id="hostnameInput">
<button onclick="initConnection()">Connect</button>
<span id="connectedStatusText">Disconnected</span>
<!-- Interfacing Script -->
<script>
var device;
function initConnection() {
// We're expecting the user to enter the hostname by itself, with the .local suffix, no http://
let hostname = document.getElementById("hostnameInput").value;
device = new BMDevice(hostname);
if (device.GETdata("/system").status == 204) {
// Status 204 is the expected behavior
document.getElementById("connectedStatusText").innerHTML = "Connected.";
}
}
</script>
</body>
</html>
```
If all has gone well, opening the Developer Console should show that we're receiving WebSocket messages from the device. Our `device` object should have all of the available
properties populated as well, since the constructor we wrote in the last article automatically subscribes to all available properties. We could, like last time, view the device
and its properties in its native, JSON form on the page. But that's not very user-friendly. Let's transform the data from the device into nice-looking HTML elements, starting with
the timecode.
### Timecode Transformations
The timecode is stored on the camera in **B**inary-**C**oded-**D**ecimal format. We'll need a function that can transform this BCD number into a readable timecode string.
This will involve converting the number into base 16 (hexadecimal), re-parsing it as a base 10 (decimal) integer, padding it with zeroes, and adding colons between each pair of digits.
This function can be written in one line, but for readability I'll expand it into multiple lines:
```JS
function parseTimecode(timecodeBCD) {
let noDropFrame = timecodeBCD & 0b01111111111111111111111111111111; // The first bit of the timecode is 1 if "Drop Frame Timecode" is on. We don't want to include that in the display.
let decimalTCInt = parseInt(noDropFrame.toString(16), 10); // Convert the BCD number into base ten
let decimalTCString = decimalTCInt.toString().padStart(8, '0'); // Convert the base ten number to a string eight characters long
let finalTCString = decimalTCString.match(/.{1,2}/g).join(':'); // Put colons between every two characters
return finalTCString;
}
```
Our `BMDevice` class contains a reference to a function called `updateUI` that we can overwrite for our purposes. The function gets called whenever the device receives a WebSocket message.
We can set this function in the `<script>` tag on our page, or in any other linked JS file. Here's the whole HTML file now:
```HTML
<!DOCTYPE html>
<html>
<head>
<title>Demo Blackmagic WebUI</title>
</head>
<body>
<!-- Import Scripts -->
<script src="BMDevice_WS.js"></script>
<!-- Page Contents -->
<h1>Demo Blackmagic WebUI</h1>
<input type="text" id="hostnameInput">
<button onclick="initConnection()">Connect</button>
<span id="connectedStatusText">Disconnected</span>
<br><br>
<span>Timecode: </span>
<span id="timecodeText"></span>
<!-- Interfacing Script -->
<script>
var device;
function initConnection() {
// We're expecting the user to enter the hostname by itself, with the .local suffix, no http://
let hostname = document.getElementById("hostnameInput").value;
// Initialize device and pass UI updating fn
device = new BMDevice(hostname);
device.updateUI = updateUI;
// If success, display Connected text.
if (device.GETdata("/system").status == 204) {
// Status 204 is the expected behavior
document.getElementById("connectedStatusText").innerHTML = "Connected.";
}
}
function parseTimecode(timecodeBCD) {
let noDropFrame = timecodeBCD & 0b01111111111111111111111111111111; // The first bit of the timecode is 1 if "Drop Frame Timecode" is on. We don't want to include that in the display.
let decimalTCInt = parseInt(noDropFrame.toString(16), 10); // Convert the BCD number into base ten
let decimalTCString = decimalTCInt.toString().padStart(8, '0'); // Convert the base ten number to a string eight characters long
let finalTCString = decimalTCString.match(/.{1,2}/g).join(':'); // Put colons between every two characters
return finalTCString;
}
function updateUI() {
// Update Timecode Span
document.getElementById("timecodeText").innerHTML = parseTimecode(device.propertyData["/transports/0/timecode"].timecode);
}
</script>
</body>
</html>
```
And now we've got a live timecode display. Awesome! It won't work with a HyperDeck, though, since it doesn't have a way to get the timecode over the network. If you are using a HyperDeck, don't include the
timecode stuff since it will cause errors.
Note that I wrote my `updateUI` function separately and passed its reference to `device.updateUI` in the `initConnection` function, since the reference can only be passed after
`device` has been initialized as a `BMDevice` object.
Now, let's add a Record button and hook it up. I'll have our `updateUI` function change the color of the button depending on whether the camera is currently recording or not.
```HTML
<button onclick="recordButton()" id="recordButton">Record</button>
```
```JS
function recordButton() {
// Get recording state from the device
let recordState = device.propertyData['/transports/0/record'].recording;
// Toggle the recording state of the device
device.record(!recordState);
}
```
```JS
// In updateUI()
document.getElementById("recordButton").style.backgroundColor = (device.propertyData['/transports/0/record'].recording ? "red" : "white");
```
In the line that sets the button's color, I used a ternary operator. It works like this:
```JS
// If a is true, the expression will evaluate to b. If a is false, it will evaluate to c.
(a ? b : c)
```
And it works! We're able to remotely press record to start and stop the camera recording. Even if the record button is physically pressed, we'll still see it update live on our site.
## Taking it Up a Notch
And now we have arrived at the reason I was able to make this tutorial in the first place: the pretty, user-friendly WebUI. You can see all of its code and try it for youself at its repository [here](https://github.com/DylanSpeiser/BM-Camera-Control-WebUI).
I wrote version 1.0 of this WebUI program before this tutorial series. After writing the tutorials and teaching myself how WebSockets work, I went back and redid all of the JavaScript for the app.
The [BMDevice.js](https://github.com/DylanSpeiser/BM-Camera-Control-WebUI/blob/main/BMDevice.js) file it uses was built from the `BMDevice_WS.js` that we wrote in this series. I'd encourage you to take a look at it and use it in your own projects!
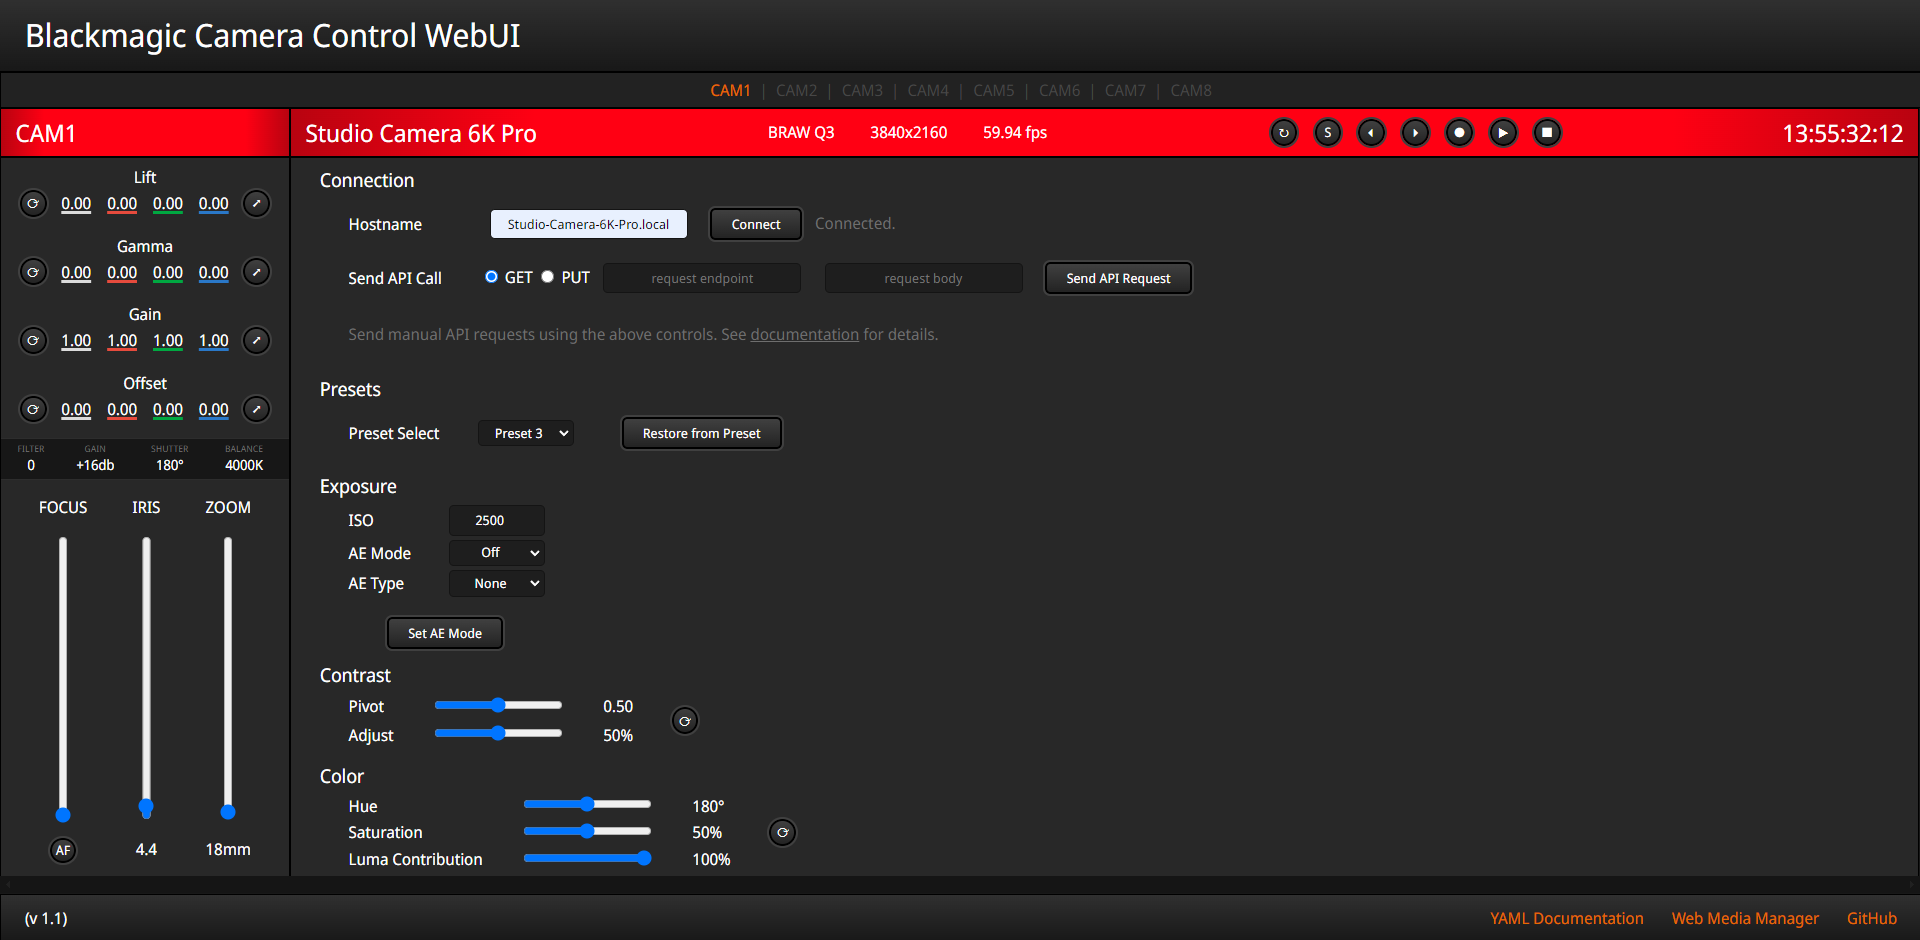 Screenshot of the WebUI I wrote
If you've used ATEM Software Control before, you'll recognize the interface. I based the colors and controls of my WebUI off of ATEM Software Control, with slight modifications.
### How I Did It
I'd like to point out some of the problems I solved while building this. Firstly, I wanted to check that the hostname entered by the user actually works
before creating the `BMCamera` object and sending it lots of API calls. So, I send one request to test the hostname, check the status code when it comes back, and if it was successful I
instantiate the object. I perform all of this in a function called `initCamera` that gets called when the user presses the "Connect" button:
```JS
// web-ui.js, line 24
// Checks the hostname, if it replies successfully then a new BMCamera object
// is made and gets put in the array at ind
function initCamera() {
// Get hostname from Hostname text field
let hostname = document.getElementById("hostnameInput").value;
try {
// Check if the hostname is valid
let response = sendRequest("GET", "http://"+hostname+"/control/api/v1/system","");
if (response.status < 300) {
// Success, make a new camera, get all relevant info, and populate the UI
cameras[ci] = new BMCamera(hostname);
cameras[ci].updateUI = updateUIAll;
cameras[ci].active = true;
document.getElementById("connectionErrorSpan").innerHTML = "Connected.";
document.getElementById("connectionErrorSpan").setAttribute("style","color: #6e6e6e;");
} else {
// Something has gone wrong, tell the user
document.getElementById("connectionErrorSpan").innerHTML = response.statusText;
}
} catch (error) {
// Something has gone wrong, tell the user
document.getElementById("connectionErrorSpan").title = error;
document.getElementById("connectionErrorSpan").innerHTML = "Error "+error.code+": "+error.name+" (Your hostname is probably incorrect, hover for more details)";
}
}
```
Notice how right after the camera is instantiated, I pass my UI updating function `updateUIAll` to the new camera object. `updateUIAll` is a big function that sets the value
and innerHTML properties of all the relevant elements on the page, based on the data we've received from the camera and stored in our object in the `propertyData` field.
All of the data in `propertyData` is organized by endpoint and stored exactly how the camera sent it: as JSON objects. So, all I have to do to update the UI elements is access
the data I need and assign it to the right elements. Some of the lines in `updateUIAll` include:
```JS
// web-ui.js, line 107:
document.getElementById("timecodeLabel").innerHTML = parseTimecode(cameras[ci].propertyData['/transports/0/timecode']?.timecode);
```
```JS
// web-ui.js, lines 143-144:
document.getElementById("irisRange").value = cameras[ci].propertyData['/lens/iris']?.normalised;
document.getElementById("apertureStopsLabel").innerHTML = cameras[ci].propertyData['/lens/iris']?.apertureStop.toFixed(1);
```
I use JavaScript's "optional chaining operator" (`?.`) a lot in this function. I use it to prevent getting errors when accessing fields that are undefined, which happens a lot
during the initial phase of connecting to the camera since we haven't gotten all of the data yet.
That is also why I added an `active` boolean field to the `BMDevice` class. If `active` is set to `false`, the `ws.onmessage` function will not call `updateUI`.
### Unadjustable
Once I had data streaming from the camera and populating the WebUI, I made some simple functions that handle input from the controls and send it to the camera with `PUTdata`.
For some elements, calling this function using the HTML `onchange` or `oninput` attribute worked fine, but many of the controls are `contenteditable` `<span>` elements.
Every time `updateUIAll` got called, it would overwrite any value I typed in before it could get sent to the camera.
My solution is to keep track of which properties the user has recently changed, and prevent `updateUIAll` from modifying the element's value until the new data has been sent to the camera.
For ISO, here's how that works:
```HTML
// The ISO input text field in index.html
<input type="number" id="ISOInput" step="100" onkeydown="ISOInputHandler()" onmousedown="unsavedChanges.push('ISO')">
```
```JS
// web-ui.js, line 482
function ISOInputHandler() {
let ISOInput = document.getElementById("ISOInput");
if (event.key === 'Enter') {
event.preventDefault;
cameras[ci].PUTdata("/video/iso", {iso: parseInt(ISOInput.value)})
unsavedChanges = unsavedChanges.filter((e) => {return e !== "ISO"});
} else {
unsavedChanges.push('ISO');
}
}
```
```JS
// web-ui.js, line 156, in updateUIAll()
if (!unsavedChanges.includes("ISO")) {
if (cameras[ci].propertyData['/video/iso'])
document.getElementById("ISOInput").value = cameras[ci].propertyData['/video/iso']?.iso;
}
```
When the user clicks the field with the mouse, or presses any key other than Enter into the text field, the string `"ISO"` is added to the `unsavedChanges` array.
If the Enter key has been pressed, the `PUTdata` command is sent and all instances of `"ISO"` are removed from `unsavedChanges`.
`updateUIAll` checks to see if `unsavedChanges` contains any `"ISO"` elements before updating the element's value.
This dance with `unsavedChanges` happens for many properties and elements, but they all work the same way. Thanks to this solution, the text fields work great. They update
when something changes on the camera, while allowing the user to type in a new value without being interrupted.
## Closing Remarks
I'll probably add more functionality to this WebUI in the future, but for now I'm very happy with how it turned out.
We have now arrived at the end of this tutorial series. I hope it was fun and useful to you. Please let me know in the Issues section of the GitHub repository if something
needs updating or clarifying.
Happy coding! - Dylan